Shop page will be helpful to you to display products in an organized manner on your site with the eCommerce modules and template.
To create shop with the theme the Woocommerce plugin is required to be installed and activated on your site.
You also may install YITH WooCommerce Wishlist plugin to enable the wishlist on your site.
We also recommend you to check the official documentation of Woocommerce plugin.
Archive WooCommerce Page
You can customize archive shop page and style it according to your needs.
The archive pages (shop, cart, checkout) are created as soon as you install the plugin and activate it in Plugins section of the WordPress admin area.
In case the pages are not created, navigate to Woocommerce System Status Tools Install Woocommerce pages (this tool will install all the missing WooCommerce pages. Pages already defined and set up will not be replaced).
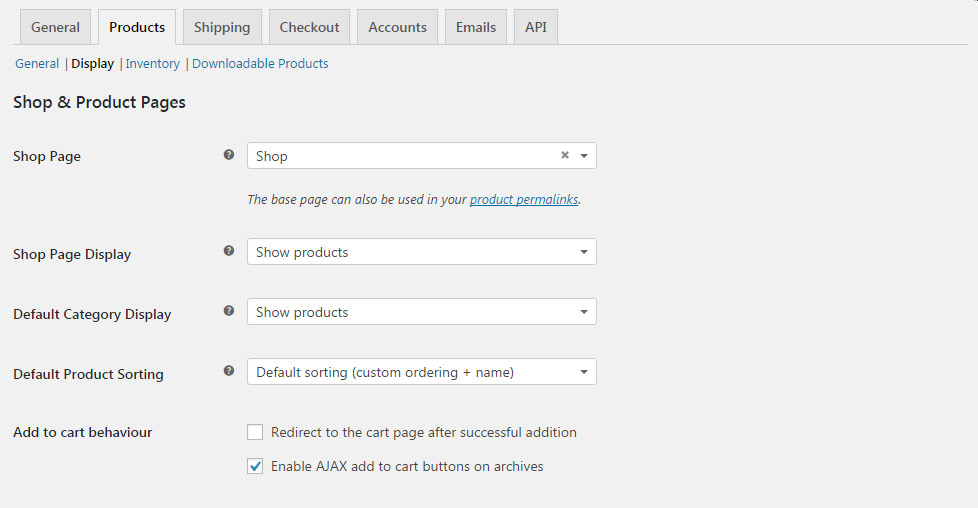
Or you can create the pages without any content and select what page to display on the archive page in WooCommerce Settings Products Display Shop & Product Pages section.
- Shop Page – you may select the page to turn it into the archive page. Note, all the page styles and modules will be overwritten with the archive structure, so you don’t have to select custom made shop page here.
- Shop Page Display – select what elements to display on the page: Show products, Show categories & subcategories or Show both.
- Default Category Display – select what elements to display on a single category page: Show products, Show categories & subcategories or Show both.
- Default Product Sorting – select the order of products by default.
- Add to cart behavior – select what to do after the product is added to the cart.
However, apart from the WooCommerce settings section, you can customize the Shop page in Theme options Woocommerce Woocommerce Category Options section. Check the corresponding section of the theme documentation for more information.
Check this post in the theme documentation for more information.
Custom WooCommerce Page
You may also create Shop page using stylish Visual Composer elements.
To make your Shop look differently and more stylish that the archive pages you need to create custom shop page.
Below you may find the short instruction on custom shop page creation.
- Navigate to the Pages section to proceed with the shop page creation.
- Click Add new and select the needed page template (we can recommend you to use For page builder for a simple page or For One Page scroll template for the page with full-height vertical sliding rows, etc.). You may check more information about the page settings in this post.
You may select the WooCommerce modules to suit your needs available withing the theme functionality. To create the unusual design and convenient structure. you may mix the WooCommerce modules with the other ones.
Check the shop page created with the WooCommerce elements pages following this link.
Archive Category Page
This is the page that displays products of certain category after you click on the category name.
Check the example of product category page here.
It cannot be modified from the Pages section of the admin panel and is generated by WooCommerce.
You may style the archive page in Theme options WooCommece Woocommerce Category Options section. Find more information about the options in this post.
WooCommerce Pages
Archive shop pages automatically generated by Woocommerce.
Cart Page/ Checkout Page/ Wishlist Page
WooCommerce generates extra pages while installation automatically.
They are used while product ordering.
Note, though such pages inherit the pre-defined theme styles, you may modify it to make it suit your needs.
You may find the Cart/Checkout pages in the Pages section.
Click on edit button and switch to Backend editor of Visual Composer, so you’ll be able to add any Visual Composer modules, and they’ll be displayed at the bottom of the page.
Make sure the page template is set to Default to keep all the styles applied properly.
